Starting a Server
Contents
How to Start a Server with Steam
The following explains how to start a server and connect to it. Currently there is no way to start a non single-player server ingame nor is there a way to limit a server to just Steam friends.
You can start a server by following these instructions.
- Open up steam and find Staxel in your library.
- Click on the start button and select
Dedicated Server.
Note: If you want to play using the same machine, press the select the Start game with Steam now. This will open up your client so that you can play. Steam does not allow multiple Staxel's open, so clicking this will still let you play.
Now lets get onto the settings;
- Public: Clicking the public Checkbox will display the server on the server list. Thus allowing anyone to join your server.
- Creative Mode:
Onforces Creative Mode to be on no matter what the world is.Offforces Creative Mode to be off no matter what the world is.Keep Server Settingkeeps whatever the world had already choosen. If you are confused leave it onKeep Server Setting. - Server Name: If the server is public, this will be the displayed name.
- Port: This is the network port the game will use. Keep this on 38465 if you don't know what you are doing.
- Attempt automatic UPnP portforwarding: This will attempt to make sure the port is open and is avaliable. Keep this on to make sure others can connect.
- Storage name: This will be World's name. If it exists it will use that world. If it doesn't it will create a new world under that name.
After you have edited the settings follow these instructions.
- Click on
Test Port. Wait for the box to change colour. - Save your external IP address.
- Click on Start.
Congratulations you should now have a working server. If you are running the game off the same machine, you can now join the server by typing "localhost" as the IP. If the game is Public, then you should also find it in the server list. Otherwise you will need to pass the server IP to your friends. (And port if that is changed from 38465.)
How to Start a Server with the Standalone Launcher
The following explains how to start a server and connect to it. Currently there is no way to start a non single-player server ingame nor is there a way to limit a server to just Steam friends.
You can start a server by following these instructions.
- Open up Standalone Launcher
- Click on the
ServerButton
Now lets get onto the settings;
- Public: Clicking the public Checkbox will display the server on the server list. Thus allowing anyone to join your server.
- Creative Mode:
Onforces Creative Mode to be on no matter what the world is.Offforces Creative Mode to be off no matter what the world is.Keep Server Settingkeeps whatever the world had already choosen. If you are confused leave it onKeep Server Setting. - Server Name: If the server is public, this will be the displayed name.
- Port: This is the network port the game will use. Keep this on 38465 if you don't know what you are doing.
- Attempt automatic UPnP portforwarding: This will attempt to make sure the port is open and is avaliable. Keep this on to make sure others can connect.
- Storage name: This will be World's name. If it exists it will use that world. If it doesn't it will create a new world under that name.
After you have edited the settings follow these instructions.
- If you don't already have Ports open, click on
Test Port. Wait for the box to change colour. If it's green your good to go. Otherwise you may need to change the port number. - Save your external IP address and port.
- Click on Start.
Congratulations you should now have a working server. If the game is Public, then you should also find it in the server list. Otherwise you will need to pass the server IP to your friends. (And port if that is changed from 38465. Format for IP address is 123.123.123.123:12345 for IPv4.)
To run the game, go back to or reopen the Standalone Launcher. If you are running the game off the same machine, you can now join the server by typing "localhost" as the IP.
How to Start a Server with the Command Line
To be written.
Using Hamachi to avoid port forwarding
Before continuing, try either #How to Start a Server with Steam or #How to Start a Server with the Launcher.
Hamachi is a well known tool which creates a LAN (Local Area Network) over the internet. Using this allows you to get around port forwarding issues which can occur using ISP supplied Routers/Modems.
Installing and Setting up Hamachi
To install Hamachi, follow the following steps:
- Download and run the Hamachi installer.
- Complete the installation and open Hamachi.
With that Hamachi is installed. Now to set up Hamachi.
- Click on the power button in the Hamachi window.
- At this point you may be asked to Log In / Sign Up. You will need to do this to create servers.
- Create a new "Network" by going to
Network→Create a new network... - Enter in the details for your server. You will need to enter in a password for this server, write this down so you can give this to your friends.
- Get your friends to join you server by getting them to go
Network→Join an existing network...by giving them the Network ID and Password.
With that you and your friends are set up.
Hosting and Joining a Server
The following explains how to start a server and connect to it. Currently there is no way to start a non single-player server ingame. So the following must be used.
Steam Hosting
- Open up steam and find Staxel in your library.
- Click on the start button and select
Dedicated Server. - If you want to play using the same machine, press the select the Start game with Steam now. This will open up your client so that you can play.
- There should be no need to change any of the settings, so click the
StartButton.
Congratulations you should now have a working server. If you are running the game off the same machine, you can now join the server by typing "localhost" as the IP.
Standalone Hosting
- Open up Standalone Launcher
- Click on the
ServerButton - There should be no need to change any of the settings, so click the
StartButton.
Congratulations you should now have a working server. You can start the game by the launcher. If you are running the game off the same machine, you can now join the server by typing "localhost" as the IP.
Connecting to a friends Server
- Start the game up and head to the server tab.
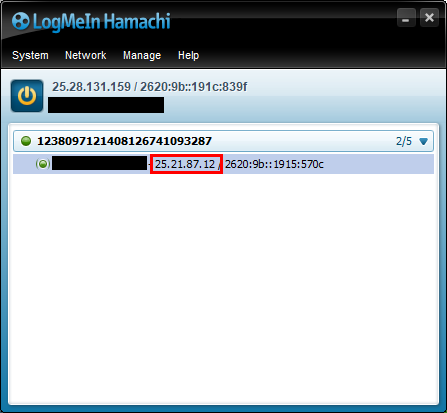
- Go back to the Hamachi window. You will need to find the Person that you want to connect to. Next to that person, there will be an IP address. Click here for an image on where to find this.
- Enter in that IP into the server window.
You should have connected to your friends server.